Sustainable Pineapple Cake
Lockdown continues, We’ve been home now for 10 weeks (I stopped counting in days a while ago) and we’ve settled into a routine. On weekdays, I teach (or plan lessons) on weekends I sew and bake.
Oddbox opened up sign-ups recently for new customers. I’ve wanted to try them for a while, and my next-door neighbours recommended them. Each Friday we receive a box of fruit and veg that has been rescued from suppliers for a variety of reasons. Maybe it was surplus, or too small or had been damaged in some way. Each week is slightly different, depending on what Oddbox had to share out.
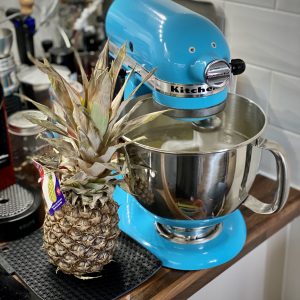
Last week, amongst the box of onions, potatoes, apricots and asparagus was a pineapple. We didn’t know what to do with it, so it sat there for a bit. This weekend we decided it really needed to be eaten!
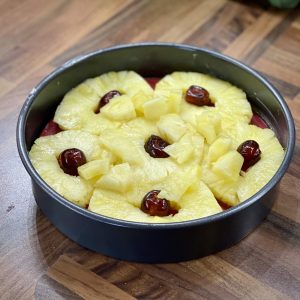
So I chose to make pineapple upside-down cake, something I haven’t had since my childhood! I figured that pineapples ring covered in basic sponge cake was probably the way to go. So a sharp knife (and a tub of glace cherries from my birthday) turned a pineapple into this:
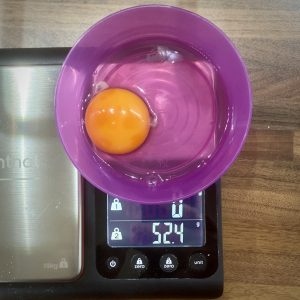
Next up was a sponge cake. So I weighed out my eggs (top tip, always base the weight of the fat, sugar and flour off the weight of the eggs!)
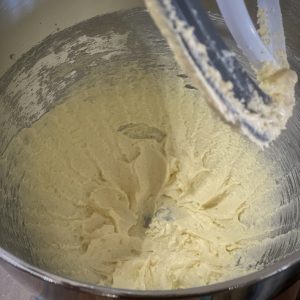
I made a 2 egg sponge batter (so 104g of margarine, sugar and self-raising flour). I beat the margarine and sugar in my KitchenAid until it was light in colour and fluffy.
Then added in the eggs and flour and mixed to a smooth batter before pouring over the pineapple rings. Then I baked it in the oven at 180°c until it was golden brown and a cocktail stick came out batter free (about 25mins).
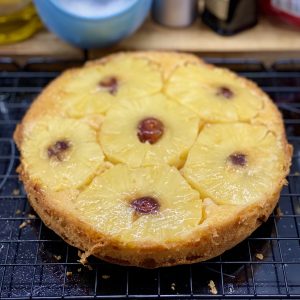
I think it looks pretty good! And I can testify that it is delicious.
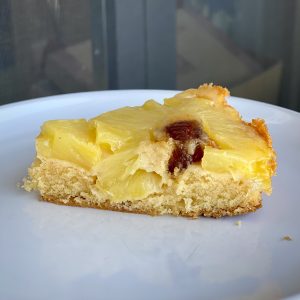
Not a bad use for a surplus pineapple!
Like everyone else in COVID-19 lockdown, getting basic food is challenging. My teenager is fragile (both emotionally and physically) and so to protect them we are trying not to leave the flat. As my teenager is also autistic, they also have a limited diet (due to sensory issues) and, as if life wasn’t fun already, is also lactose intolerant.
One of the things that is a staple part of my teenager’s diet is basic white bread with a soft, non-floury, crust. But getting bread is difficult. Especially when you can’t get weekly food deliveries and you are trying really hard not to leave the flat (17 days and counting).
So I’ve taken to trying to bake my own bread. The first one I made didn’t work, it “tasted weird”. But the second one got a thumbs up. So here is my recipe for the most basic of white bread. With a (hopefully) soft crust and absolutely no floury top!
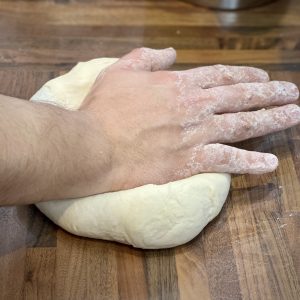
It helps to have an (optional) boyfriend on hand, who really enjoys kneading!
The bread is simply strong flour, salt, sugar, yeast and water (specific quantities below) and a lot of patience and time – something I seem to have a lot of at the moment.
After your ingredients are mixed well and you have a dough, you need to knead it. This works the gluten in the bread making it soft, warm and stretchy. You are aiming for dough you can stretch until it is translucent without breaking (the windowpane test).
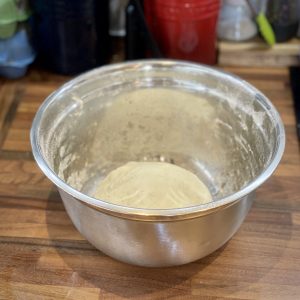
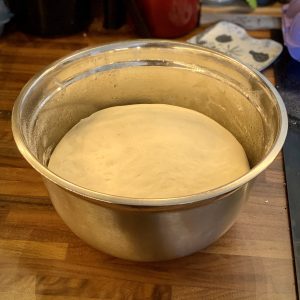
Once it is soft, warm and stretchy, scoop it into a ball and place in an oiled bowl. Cover with a tea towel and leave for 2 hours to double in size (this is called proving). Don’t do what I did and mix up your proving times and leave it only to prove for 1 hour before working it.
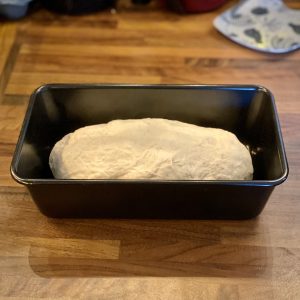
After the first proving, it will have doubled in size. Knock it back, something that is very satisfying, and knead again. For the uninitiated, knocking back is when you gently punch the air out of your dough before scooping the now floppy dough out of the bowl again.
Then roll it into a sausage shape and pop into a loaf tin (you don’t have to use a loaf tin, but I am aiming for as uniform and simple a bread as possible – remember I have a teenager who needs to eat this!). Cover it with the tea towel again and leave for an hour (not 2 hours as I did – sigh!).
Once again it will have doubled in size. Now you just need to slash the top of the bread with a serrated knife and pop it in the oven.
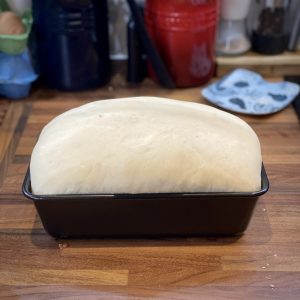
All being well, after 30mins in the oven you’ll have a lovely, incredibly simple-looking, loaf of bread. Due to my ahem tiny proving error, mine collapsed in the oven a bit. But it is still bread and still tastes good.
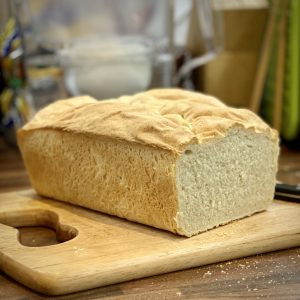
Most importantly, my teenager has just devoured 3 slices of marmite on toast – courtesy of my homemade bread! Success!
Basic White Bread
Ingredients
- 500 g Strong White Bread Flour
- 1 ½ tsp Salt
- 1 tsp Caster Sugar
- 1 sachet Fast Action Yeast 7g
- 300 ml Warm Water
Instructions
- Put the flour, sugar, salt and yeast in a bowl. Make sure the yeast and salt are on opposite sides of the bowl!
- Mix the dry ingredients together.
- Add the warm water (make sure this is not from the hot tap, but is a mix of water from your kettle and cold water, should be between 40°c and 50°c, or warm to the touch).
- Mix the water into the dry ingredients until you have a dough. It might be a bit sticky, but don't worry.
- Turn the dough onto a clean table and knead. Keep kneading until the dough feels warm, soft and not sticky. This might take about 10 mins.
- Lightly oil the bowl and place the dough back in. Cover with a tea towel and leave for 2 hours.
- When the dough has doubled in size, knock it back and turn out onto the table surface again.
- Knead again, but only for a couple of minutes this time. Shape into a sausage, trying to keep a smooth surface on the top. Place into a loaf tin.
- Cover and leave for 1 hour.
- Heat your oven to 190°c.
- When the dough has again doubled in size, slash the top with a serrated knife and put in the oven.
- Bake for 25-30 mins. You can take the bread out of the tin with a clean tea towel and tap the bottom. If it sounds hollow, then it's done.
- Take your bread out of the oven and out of the tin and leave to cool.
- The finished bread keeps well, I keep mine in an old loaf's plastic bag.
It’s been a while since I posted. January and February passed by in a blur, it was the busiest term at school. The term when we have to get all the Year 11 pupils to finish the coursework they’ve been working on for a year. The coursework that is worth 50% of their GSCE grade. It was lots of late nights and feeling stressed.
Then March arrived, we all started becoming more and more worried about this new virus that was starting to spread. Before we knew its, pupils and staff were self-isolating and then in a blur school was closed down and we were working from home.
It’s been a very strange spring term. By now I’ve already taught remotely for a week and started my Easter holidays. I also haven’t left my flat for 2 weeks.
My days are now filled with creating tutorials for stressed teachers trying to teach online (for many a new scary place), crafting (I’ll do a post about my quarantine quilt), keeping my autistic, depressed teenager calm and fed (more stressful than you think it’s going to be) and baking basics.
So far in my basic food baking adventure, I have made:
- Bread (white, with a soft crust – very specific instructions from said teenager)
- Pitta Bread (which I will try and post about at some point)
- Scones
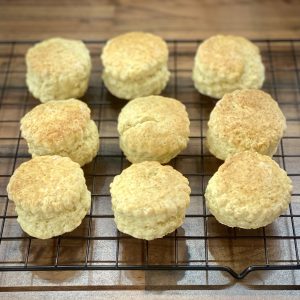
Today I thought I would share my very basic completely dairy-free scone recipe.
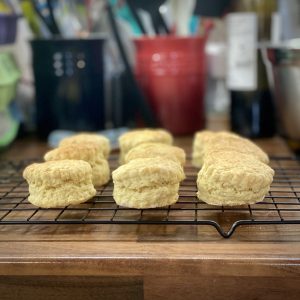
Now the trick to a good scone is to touch it as little as possible and to eat them as soon as possible!
It has 3 basic stages:
- Rub together the flour and fat, using the tips of your fingers until it resembles bread crumbs. If you have naturally hot hands (which I do not!) then you might want to wash them in cold water first, just make sure you dry them really well.
- Mix in cold milk, using a table knife – so you don’t touch it with your warm hands!
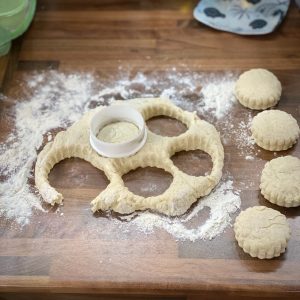
- Very briefly knead it before gently squishing it and then cutting out rounds with a cutter.
By minimising touching and keeping things cool, you should end up with crumbly soft scones.
Back when I taught Food Technology (a very, very long time ago), I used to teach 13 yr olds how to make scones. They would invariably end up squishing the dough around before finally cutting it out and then say the scones didn’t taste nice, as they were dense and chewy. So when I say handle as little as possible, I mean it!
Scones (Dairy-Free)
Ingredients
- 225 g Self Raising Flour
- 1 pinch Salt
- 55 g Stork Margarine
- 25 g Caster Sugar
- 150 ml Oat Milk
Instructions
- Preheat the oven to 220°c (200°c fan)
- Rub the flour, salt and margarine together using the tips of your fingers, until it resembles breadcrumbs.
- Stir in the sugar with a table knife.
- Mix in the oat milk, a little at a time, with the table knife until the dough has come together. It should be a soft dough, not sticky. You'll probably have some leftover milk.
- Turn out the dough onto a lightly floured surface. Gently knead it.
- Gently squish the dough until it forms a slab about 2cm thick. Cut out rounds of dough with a 5cm cutter.
- Gently squish the leftover dough together and repeat, until you have no dough left.
- Places the rounds on a baking tray and brush some leftover milk on the top of each scone.
- Bake in the oven for 10-15mins. Until the scones have risen and are golden brown.
- Take them out of the oven and leave them on a wire rack to cool.
I like to split my scones in half and slather them in raspberry jam when I eat them. I know that a scone purist would be cross with me, but what can I say – I like what I like!
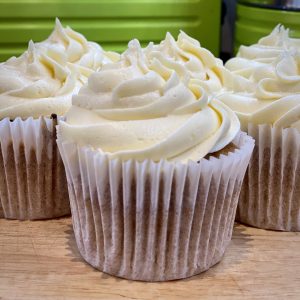
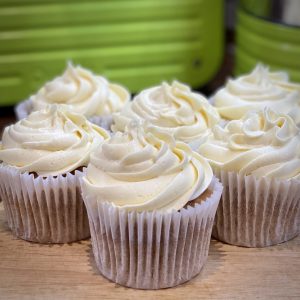
Yesterday I had my birthday party. I rarely go all out for birthdays, but because this was a special one, I hired a pub function room and invited all my friends to come and celebrate with me. Of course, this also meant baking cupcakes! I made the coffee cupcakes again from the previous week, as they were really popular. I also made basic vanilla cupcakes, with 2 colour buttercream icing. This recipe was from the Hummingbird Bakery, and it works really well. I just subbed the butter for Pure Margarine and the milk for Oat Milk.
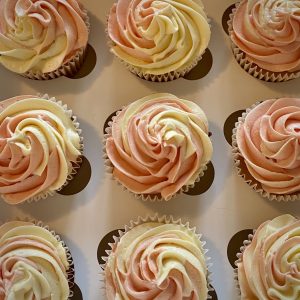
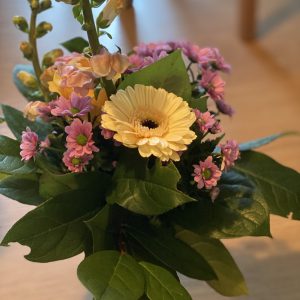
I chose the icing to match the flowers I decorated the room with. I asked my local florist (which I adore, and not just because their name is Doris Florist) to make small bunches to go into some jam jars that I decorated with hessian. They did a brilliant job!
I wanted a third kind of cupcake, one that didn’t have buttercream icing. After thinking (and browsing Pinterest) for a while I decided on a Cherry Bakewell cupcake.
A Cherry Bakewell Tart has four very distinct parts:
- An almond frangipane layer
- A raspberry jam layer
- A thick layer of fondant icing
- Half a cherry on top
It is usually encased in a sweet pastry case, but I didn’t want to include that part.
I started by making an almond cupcake with half flour and half ground almonds. However, when I took it out of the oven it had an odd granulated texture. The cake itself was quite dense and sank in the middle. So I went back to the drawing board!
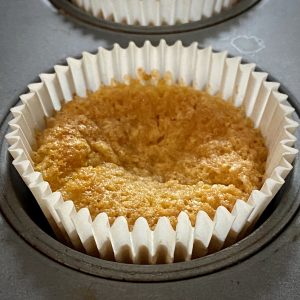
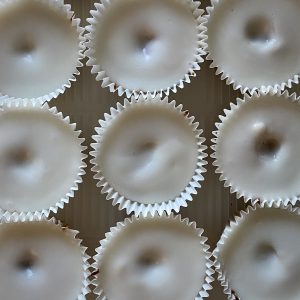
The next batch I made were basic cupcakes with almond extract for the flavouring. This worked perfectly. They were light and fluffy with a satisfying almond taste and smell. Once they were cool, I used a cupcake corer to remove the middle from each cake.
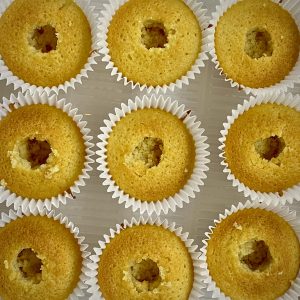
I then filled the holes with raspberry jam, I didn’t want the jam to be too sweet (the cake with icing was going to be overwhelmingly sweet!), so I bought some Bonne Mamon Raspberry Intense, which said it had more fruit and less sugar. I can confirm that it does! It is delicious, not too sweet and packed with raspberries.
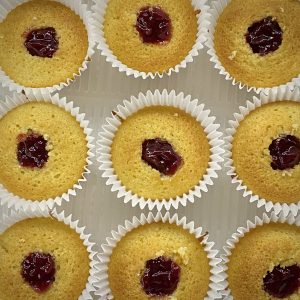
I then mixed up icing sugar with lemon juice, to get that thick fondant icing that has a satisfying tart aftertaste. With hindsight, I realised that I should have saved the cupcake cores, so I could cover the jam centres before icing. Once the icing set there was a definite sinkhole where the jam was.
Fortunately, I still had to add the cherries, so I made sure to cover each sinkhole with half a glace cherry. Again, I wanted to try and avoid that overly saccharine taste with the cherry, so I chose the Waitrose Cook’s Ingredients ones, as they were slightly less sweet than the bright red version.
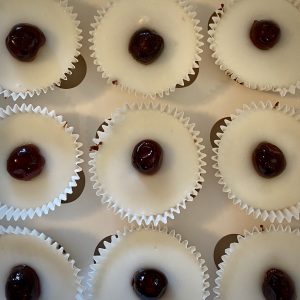
I asked my guests to let me know what they thought and the feedback was very good. Everyone agreed that it tasted very similar to a Bakewell Tart. I’ve already been asked to make them again.
Cherry Bakewell Cupcakes (Dairy-Free)
Equipment
- cupcake tin
- Cupcake Corer (or a teaspoon)
Ingredients
Almond Cupcakes
- 120 g Plain Flour
- 140 g Caster Sugar
- 1 ½ tsp Baking Powder
- 40 g Pure Margarine
- 120 ml Oat Milk
- 1 Egg
- 1 tsp Almond Extract
- Raspberry Jame
Icing
- 500 g Icing Sugar
- Lemon Juice
- 6-12 Glace Cherries
Instructions
Cupcakes
- Preheat the oven to 170°c
- Put the flour, sugar, baking powder and margarine in a bowl and mix until you have a breadcrumb-like consistency (this is much easier if you do it with a freestanding mixer).
- Add the egg, milk and almond extract and mix until the mixture is smooth. It will be very liquid, don't worry!
- Divide the mixture into 12 cupcake cakes. This is easier if you decant it into a jug and pour it into the cases.
- Bake in the centre of the oven for 20mins. A cocktail stick should come out clean, if not then give them a few more minutes.
- Leave the cakes on a wire rack to cool.
- When they are cool, use the corer to remove the centre of the cupcakes (or use a teaspoon). Spoon raspberry jam into the hole.
Icing and Decoration
- Put the icing sugar in a large bowl. Add lemon juice 1 tsp at a time mixing well. You are aiming for a thick icing.
- Spoon or pipe the icing over the top of the cakes. Make sure the icing covers the whole of the cake top.
- Leave the icing to fully set, otherwise, your cherry will sink.
- Cut the glace cherries (I cut ⅔ of a cherry because I wanted a more generous cherry on top of the cake).
- Place the cherry on top of the icing.

The final batch of cupcakes for my birthday were Apple & Maple Syrup cupcakes. These turned out to be quite popular (I called them Caramel Apple Cupcakes). They are very easy to make and, once again, I managed to make them dairy-free.
Apple & Maple Syrup Cupcakes
Ingredients
Cake
- 125 g Pure Margarine
- 225 g Soft Brown Sugar
- 300 g Self Raising Flour
- 2 tsp Ground Cinnamon
- 120 ml Maple Syrup
- 4 medium Eggs
- 180 g Grated Apple about 2 Bramley Apples
Frosting
- 175 g Pure Margarine
- 500 g Icing Sugar
- 2 tbsp Maple Syrup
- 2 tbsp Oat Milk
Instructions
Cake
- Preheat the oven to 175°c
- Beat the butter and sugar together until light and fluffy.
- Add an egg, followed by ¼ of the flour and cinnamon and mix well.
- Repeat until all the egg, flour and cinnamon is mixed in.
- Mix in the maple syrup
- Mix in the grated apple.
- Spoon the mixture into cake cases, I found that it filled 18 cupcake cases, each about ⅔ full.
- Bake for 20 mins, or until a cocktail stick comes out clean.
- Leave to cool, while you make the frosting.
Frosting
- Mix the margarine, icing sugar, maple syrup and milk until well combined. It should be quite stiff!
- Spoon into a piping bag and pipe a swirl of frosting onto the cold cupcake.
- If you don't have a piping bag then you can spoon the frosting on.
The finished cupcakes were moist and delicious.
It’s my birthday party next Saturday. I have decided to make the coffee cupcakes again, but also to make plain vanilla ones (with coloured icing) and hopefully Cherry Bakewell cupcakes. So watch this space, I’ll let you know how they go!
I always thought that I would finally be a “proper grown-up” when I owned a KitchenAid mixer. Then back in 2015 I finally decided to buy one for myself. I love it! I use is for all of my baking.
But my poor KitchenAid sits on the side of my very small kitchen. Due to its proximity to the hob, it’s been getting quite greasy.
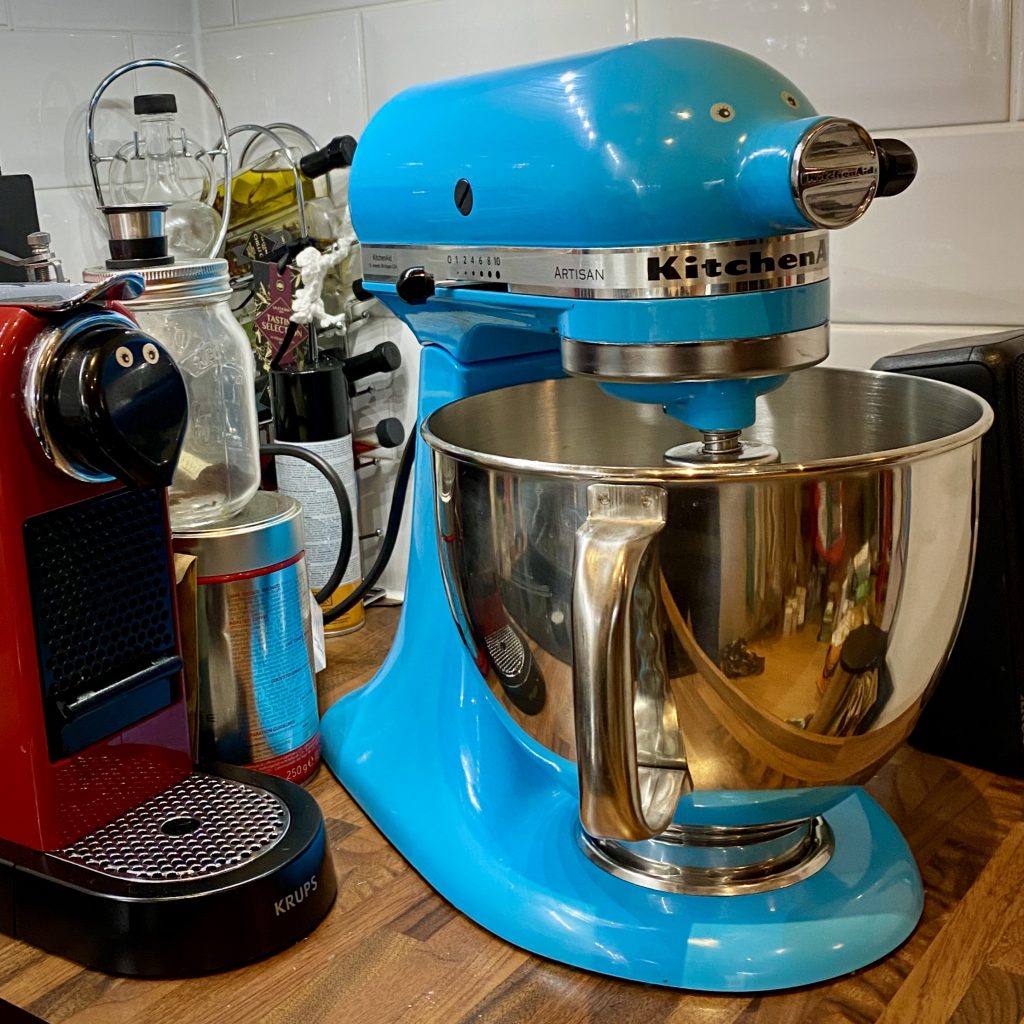
I also wanted to take part in the #makenine challenge this year, which is to challenge yourself to make nine things over the course of 2020. I thought I would start by making a cover for my KitchenAid.
I decided to make a quilted cover, but as I’ve never quilted anything before it was going to be a challenge!
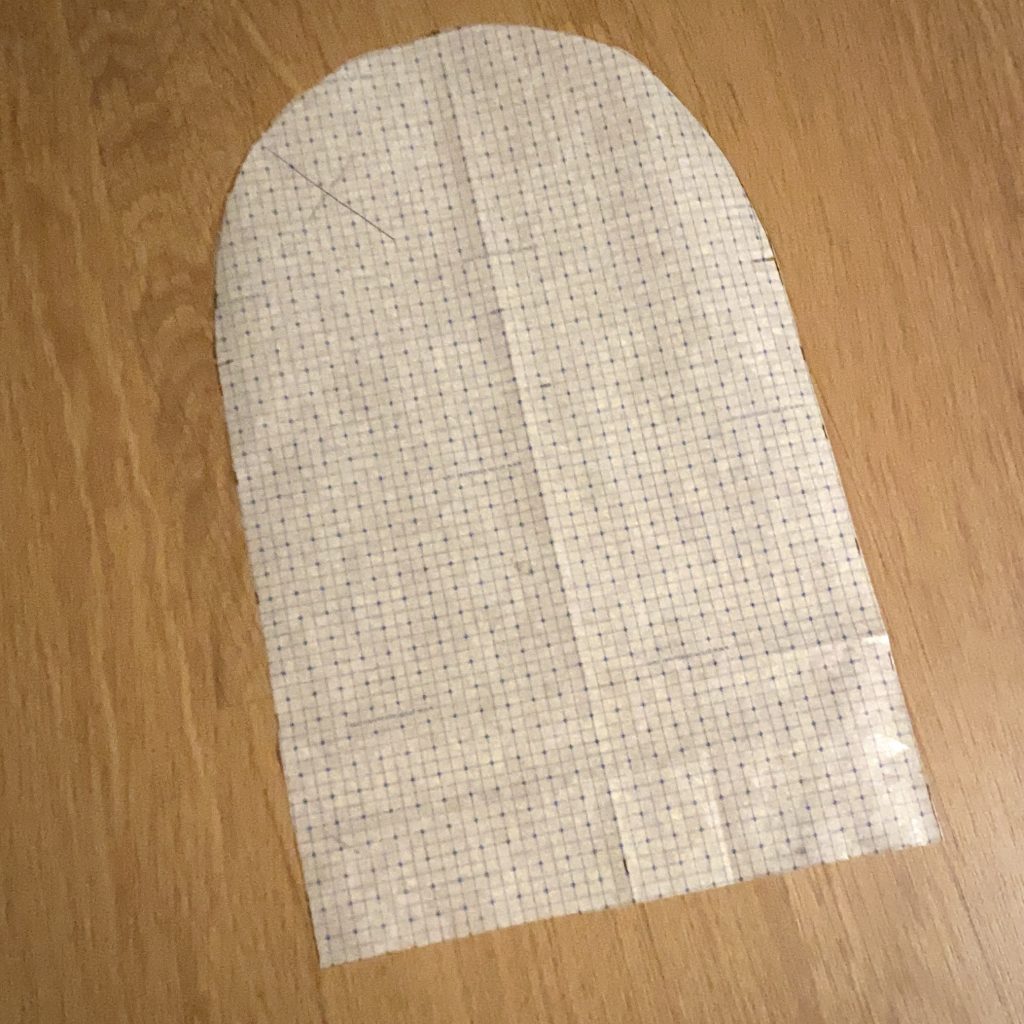
I started by drafting the front of the cover and then cut out the fabric and wadding.
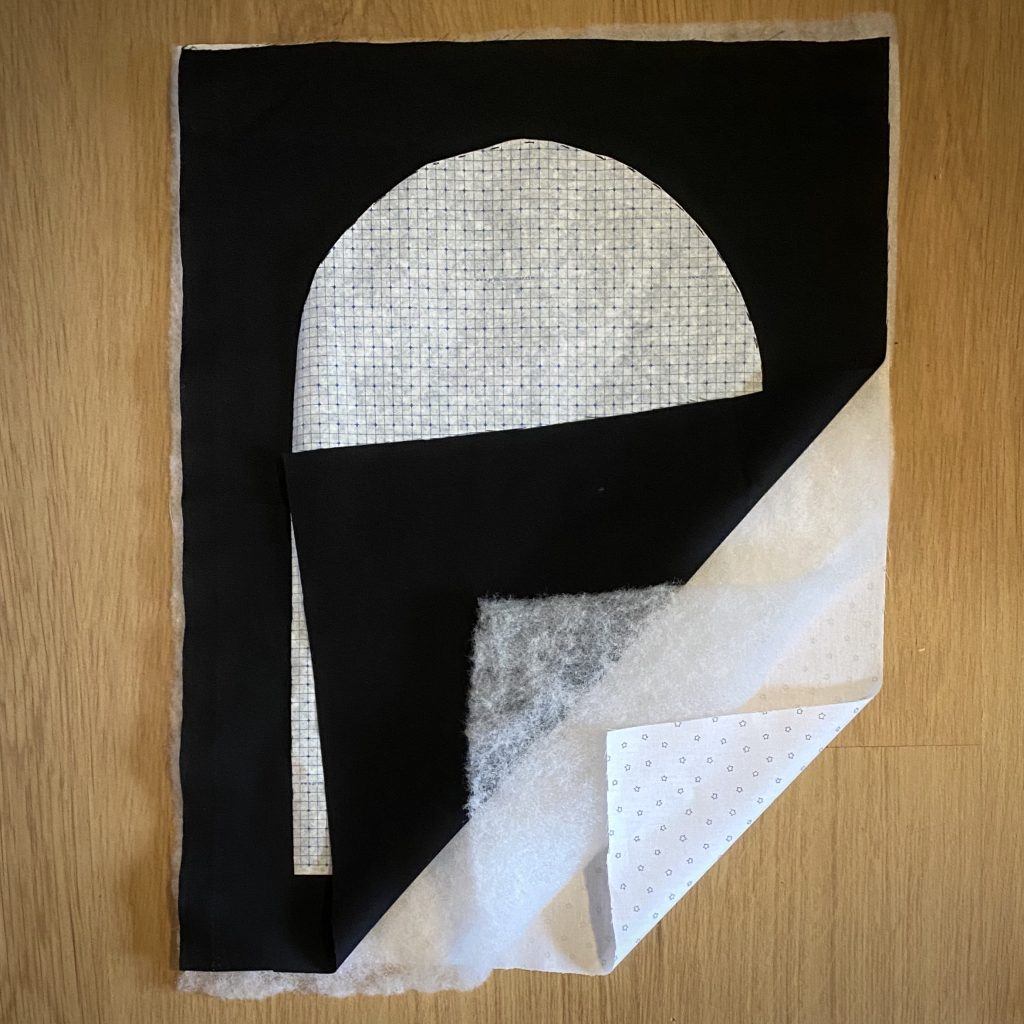
I cut the fabric bigger than the pattern, so that I had space to quilt as I suspected that the fabric would shrink.
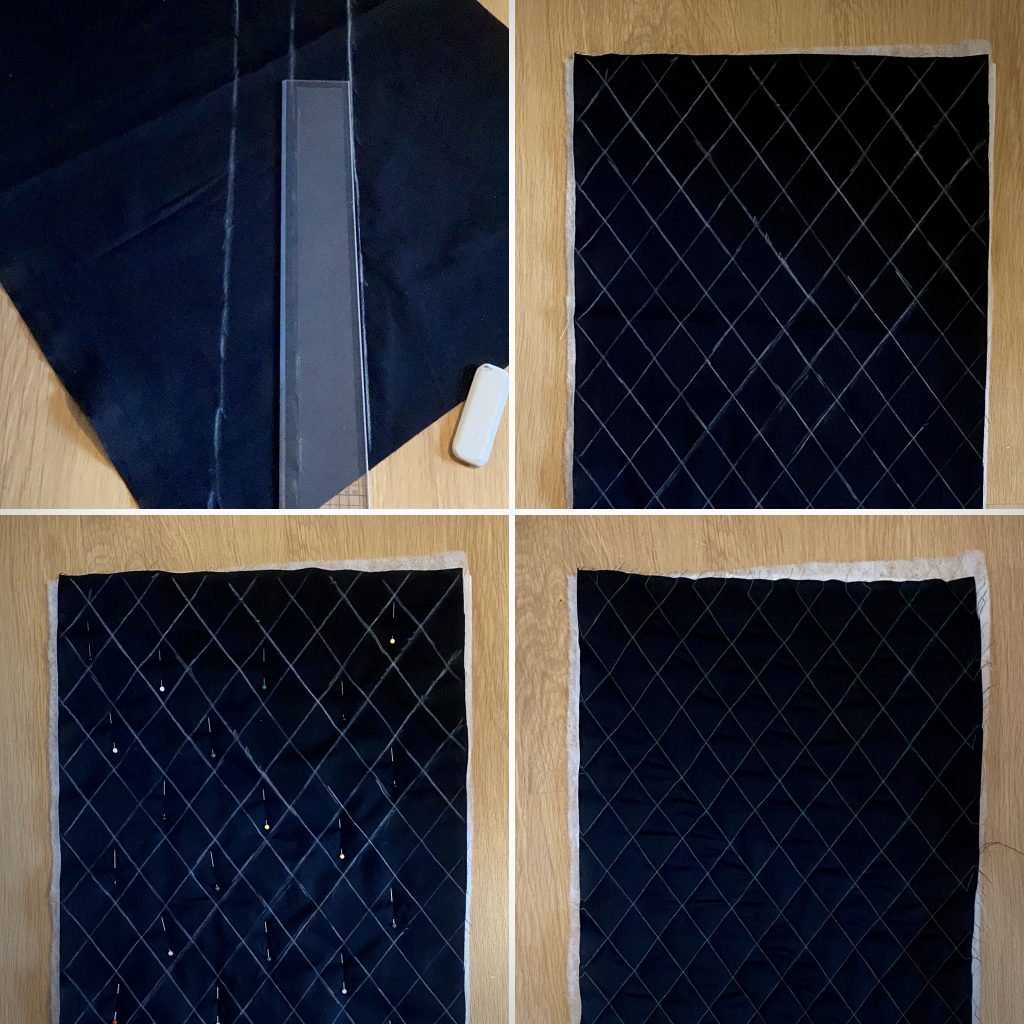
I then used tailors chalk to mark out the quilting lines and pinned the 3 layers together. I then sewed the quilting lines.
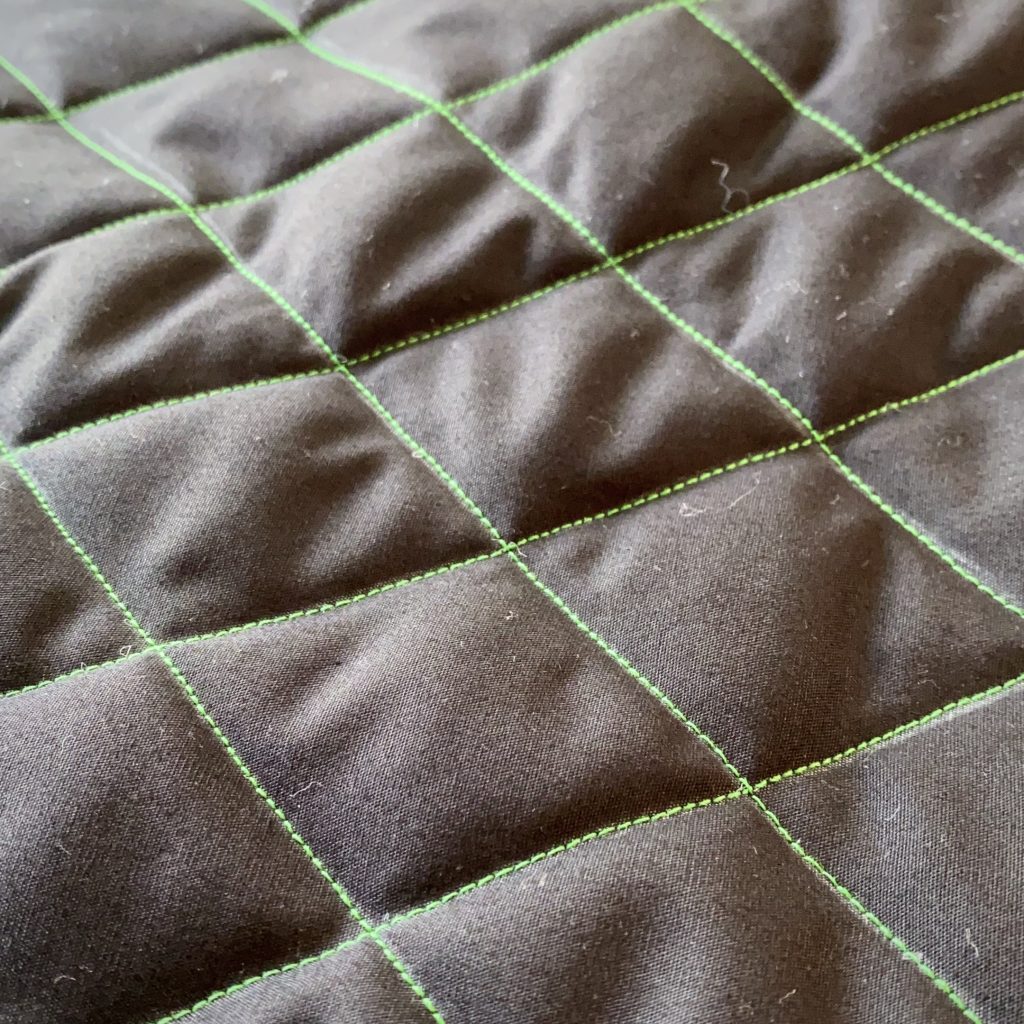
The final quilted piece looked amazing! I really liked the green thread on the black fabric. I repeated this process on the back piece and a rectangular piece that would make the top and sides. After cutting out the shaped pattern pieces I could pin it all together and see the edges.
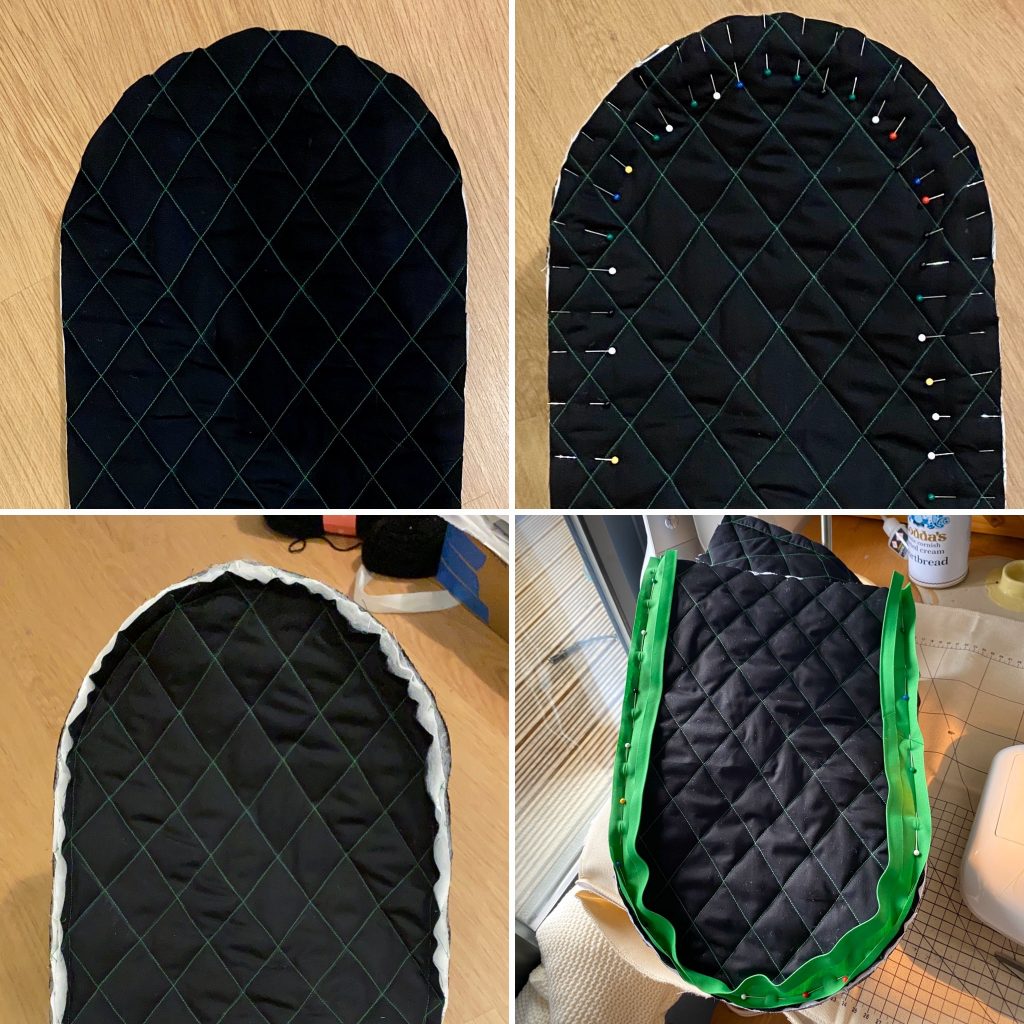
I decided to finish the edges with bias binding, which involved a lot of hand sewing!
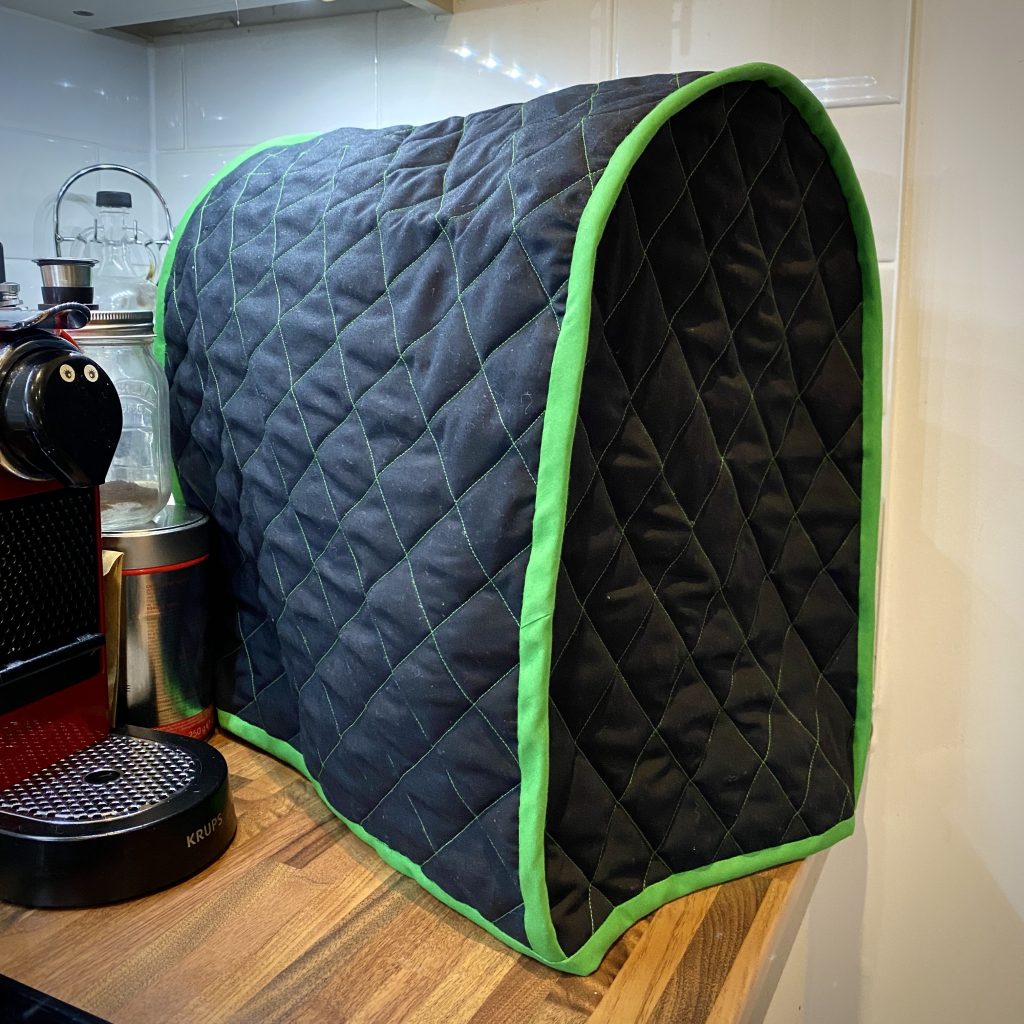
The finished cover fits perfectly! And looks great in my kitchen. One down on the #makenine nine to go.
-

A 2022 Embroidery Challenge
4 February 2023
I’ve been watching people making temperature quilts on social media for a few years and really liked the idea of making one. But I knew I would struggle to carry such a large project through to the end, plus the idea of knitting a blanket in the heat of summer wasn’t that appealing. Then I […]
-
Little Life Update
3 February 2023
I finally caught COVID, and while I am curled up on my sofa feeling sorry for myself, I thought I would check through things. I realised that I haven’t written anything on this blog for ages (gulp April 2021) and so much has happened! The problem is that Instagram is so much quicker and easier […]
-

Alison Glass Lumen Quilt
19 April 2021
In which I attempt to make a giant quilt, for the first time!
-

Cactus Embroidery – Slow Sewing
6 February 2021
It’s taken just over a year, but this embroidery is finally finished!
-

Mushroom Ragu – Vegan and Delicious!
1 January 2021
It's new year's day and I'm making Mushroom Ragu.
-
A 2022 Embroidery Challenge
4 February 2023
I’ve been watching people making temperature quilts on social media for a few years and really liked the idea of making one. But I knew I would struggle to carry such a large project through to the end, plus the idea of knitting a blanket in the heat of summer wasn’t that appealing. Then I […]
-
Little Life Update
3 February 2023
I finally caught COVID, and while I am curled up on my sofa feeling sorry for myself, I thought I would check through things. I realised that I haven’t written anything on this blog for ages (gulp April 2021) and so much has happened! The problem is that Instagram is so much quicker and easier […]
-
Alison Glass Lumen Quilt
19 April 2021
In which I attempt to make a giant quilt, for the first time!
-
Cactus Embroidery – Slow Sewing
6 February 2021
It’s taken just over a year, but this embroidery is finally finished!
-
Mushroom Ragu – Vegan and Delicious!
1 January 2021
It's new year's day and I'm making Mushroom Ragu.